Flower Patchwork Tote Bag (PDF Pattern)
This ROBERTS | WOOD KiT project is provided as a PDF pattern with step-by-step sewing instructions.
The download includes 2 size options, Small and oversized. There is also the option to make either tote bag size with raw flower patchwork edges or fully bagged out flower patchwork pieces. All patterns for each option are provided
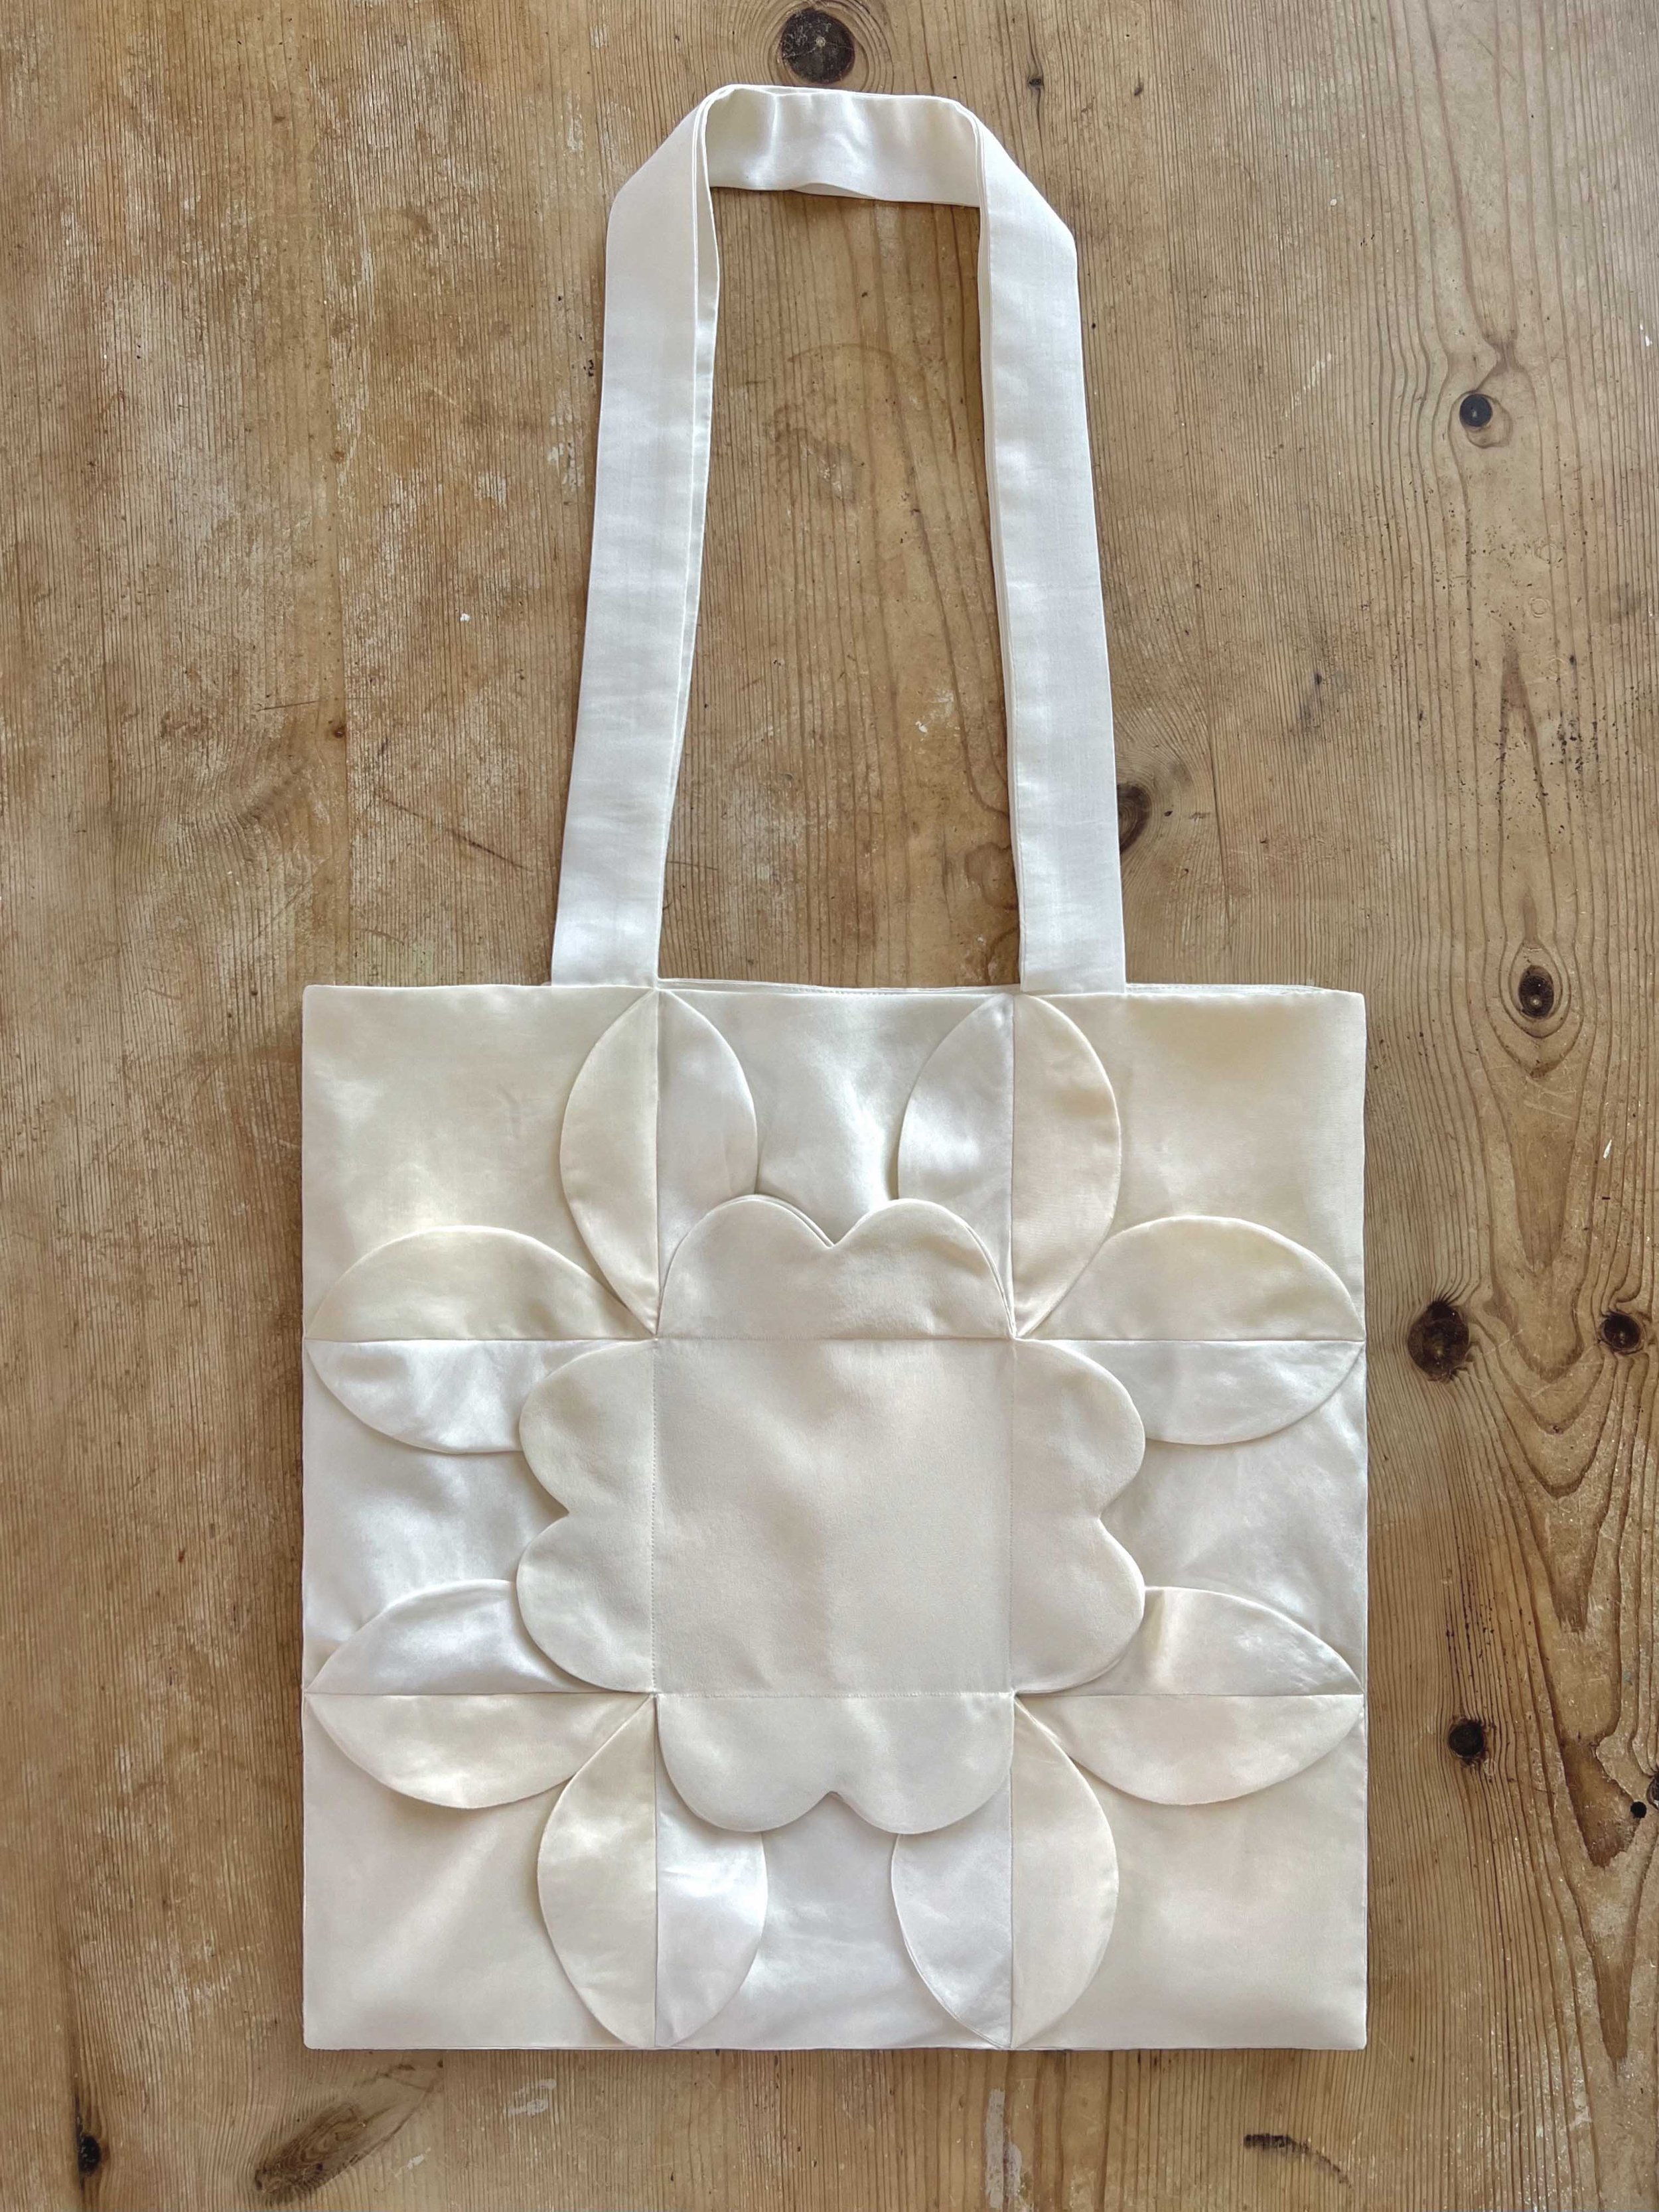
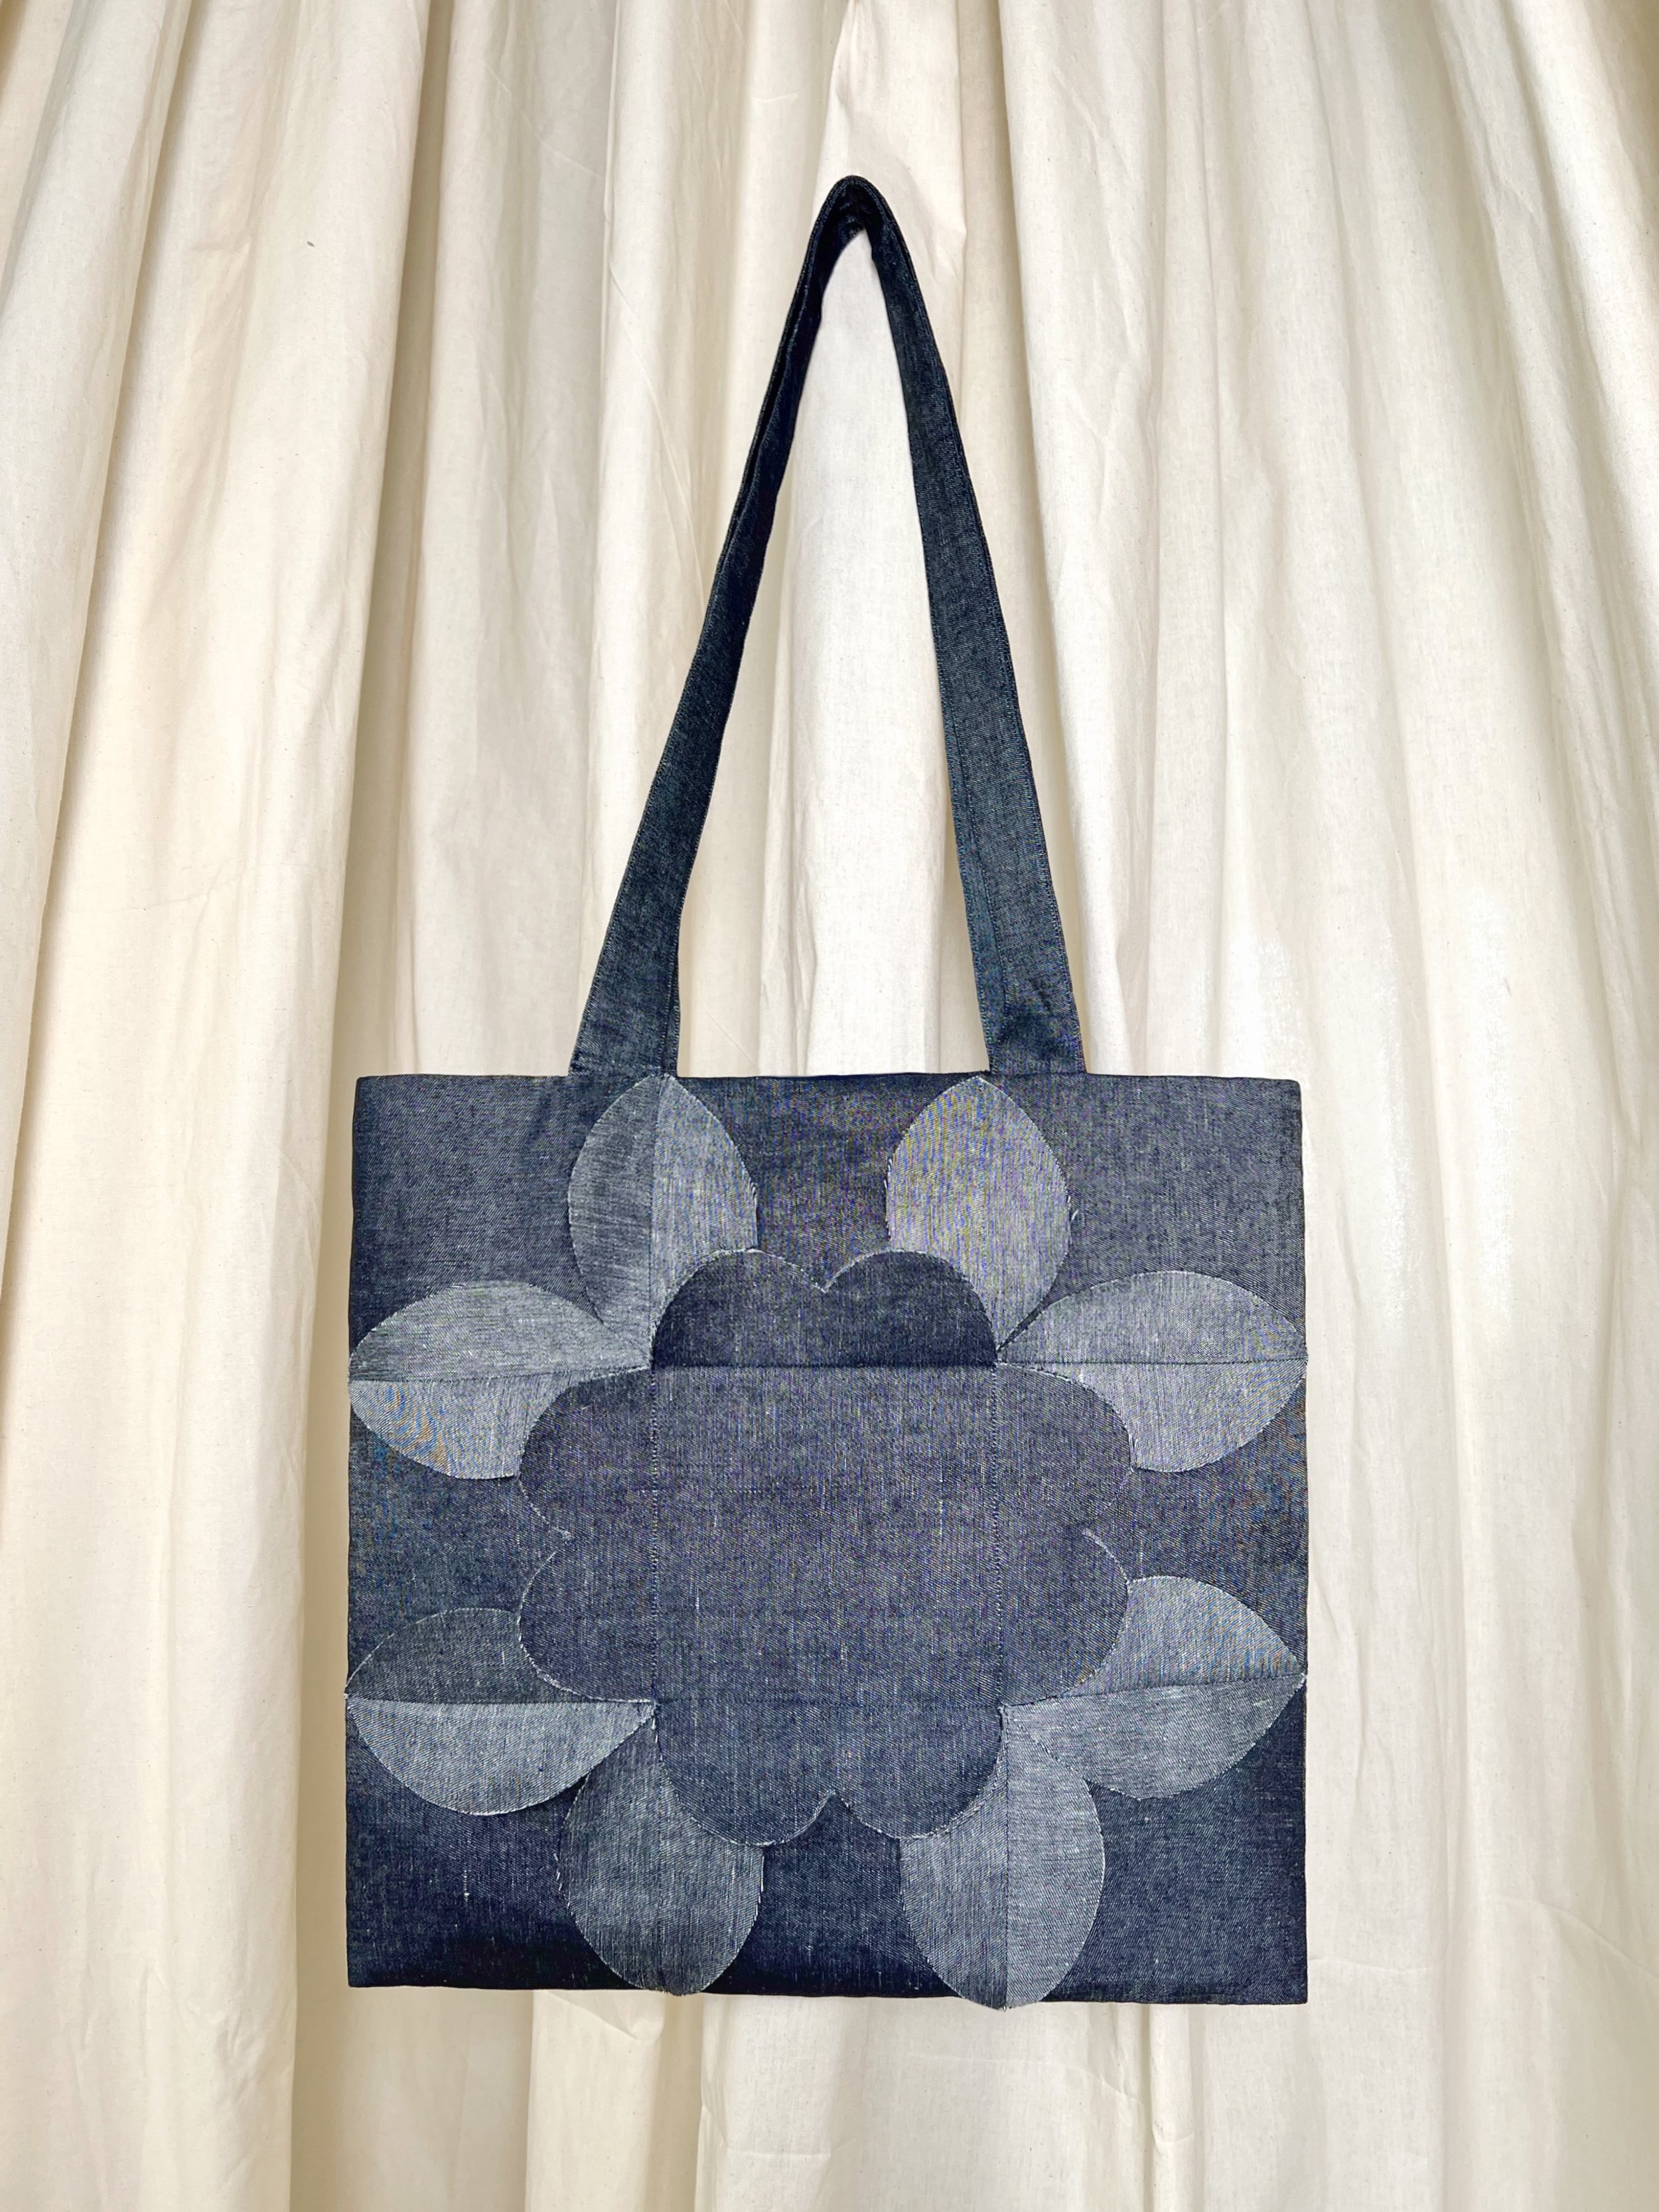
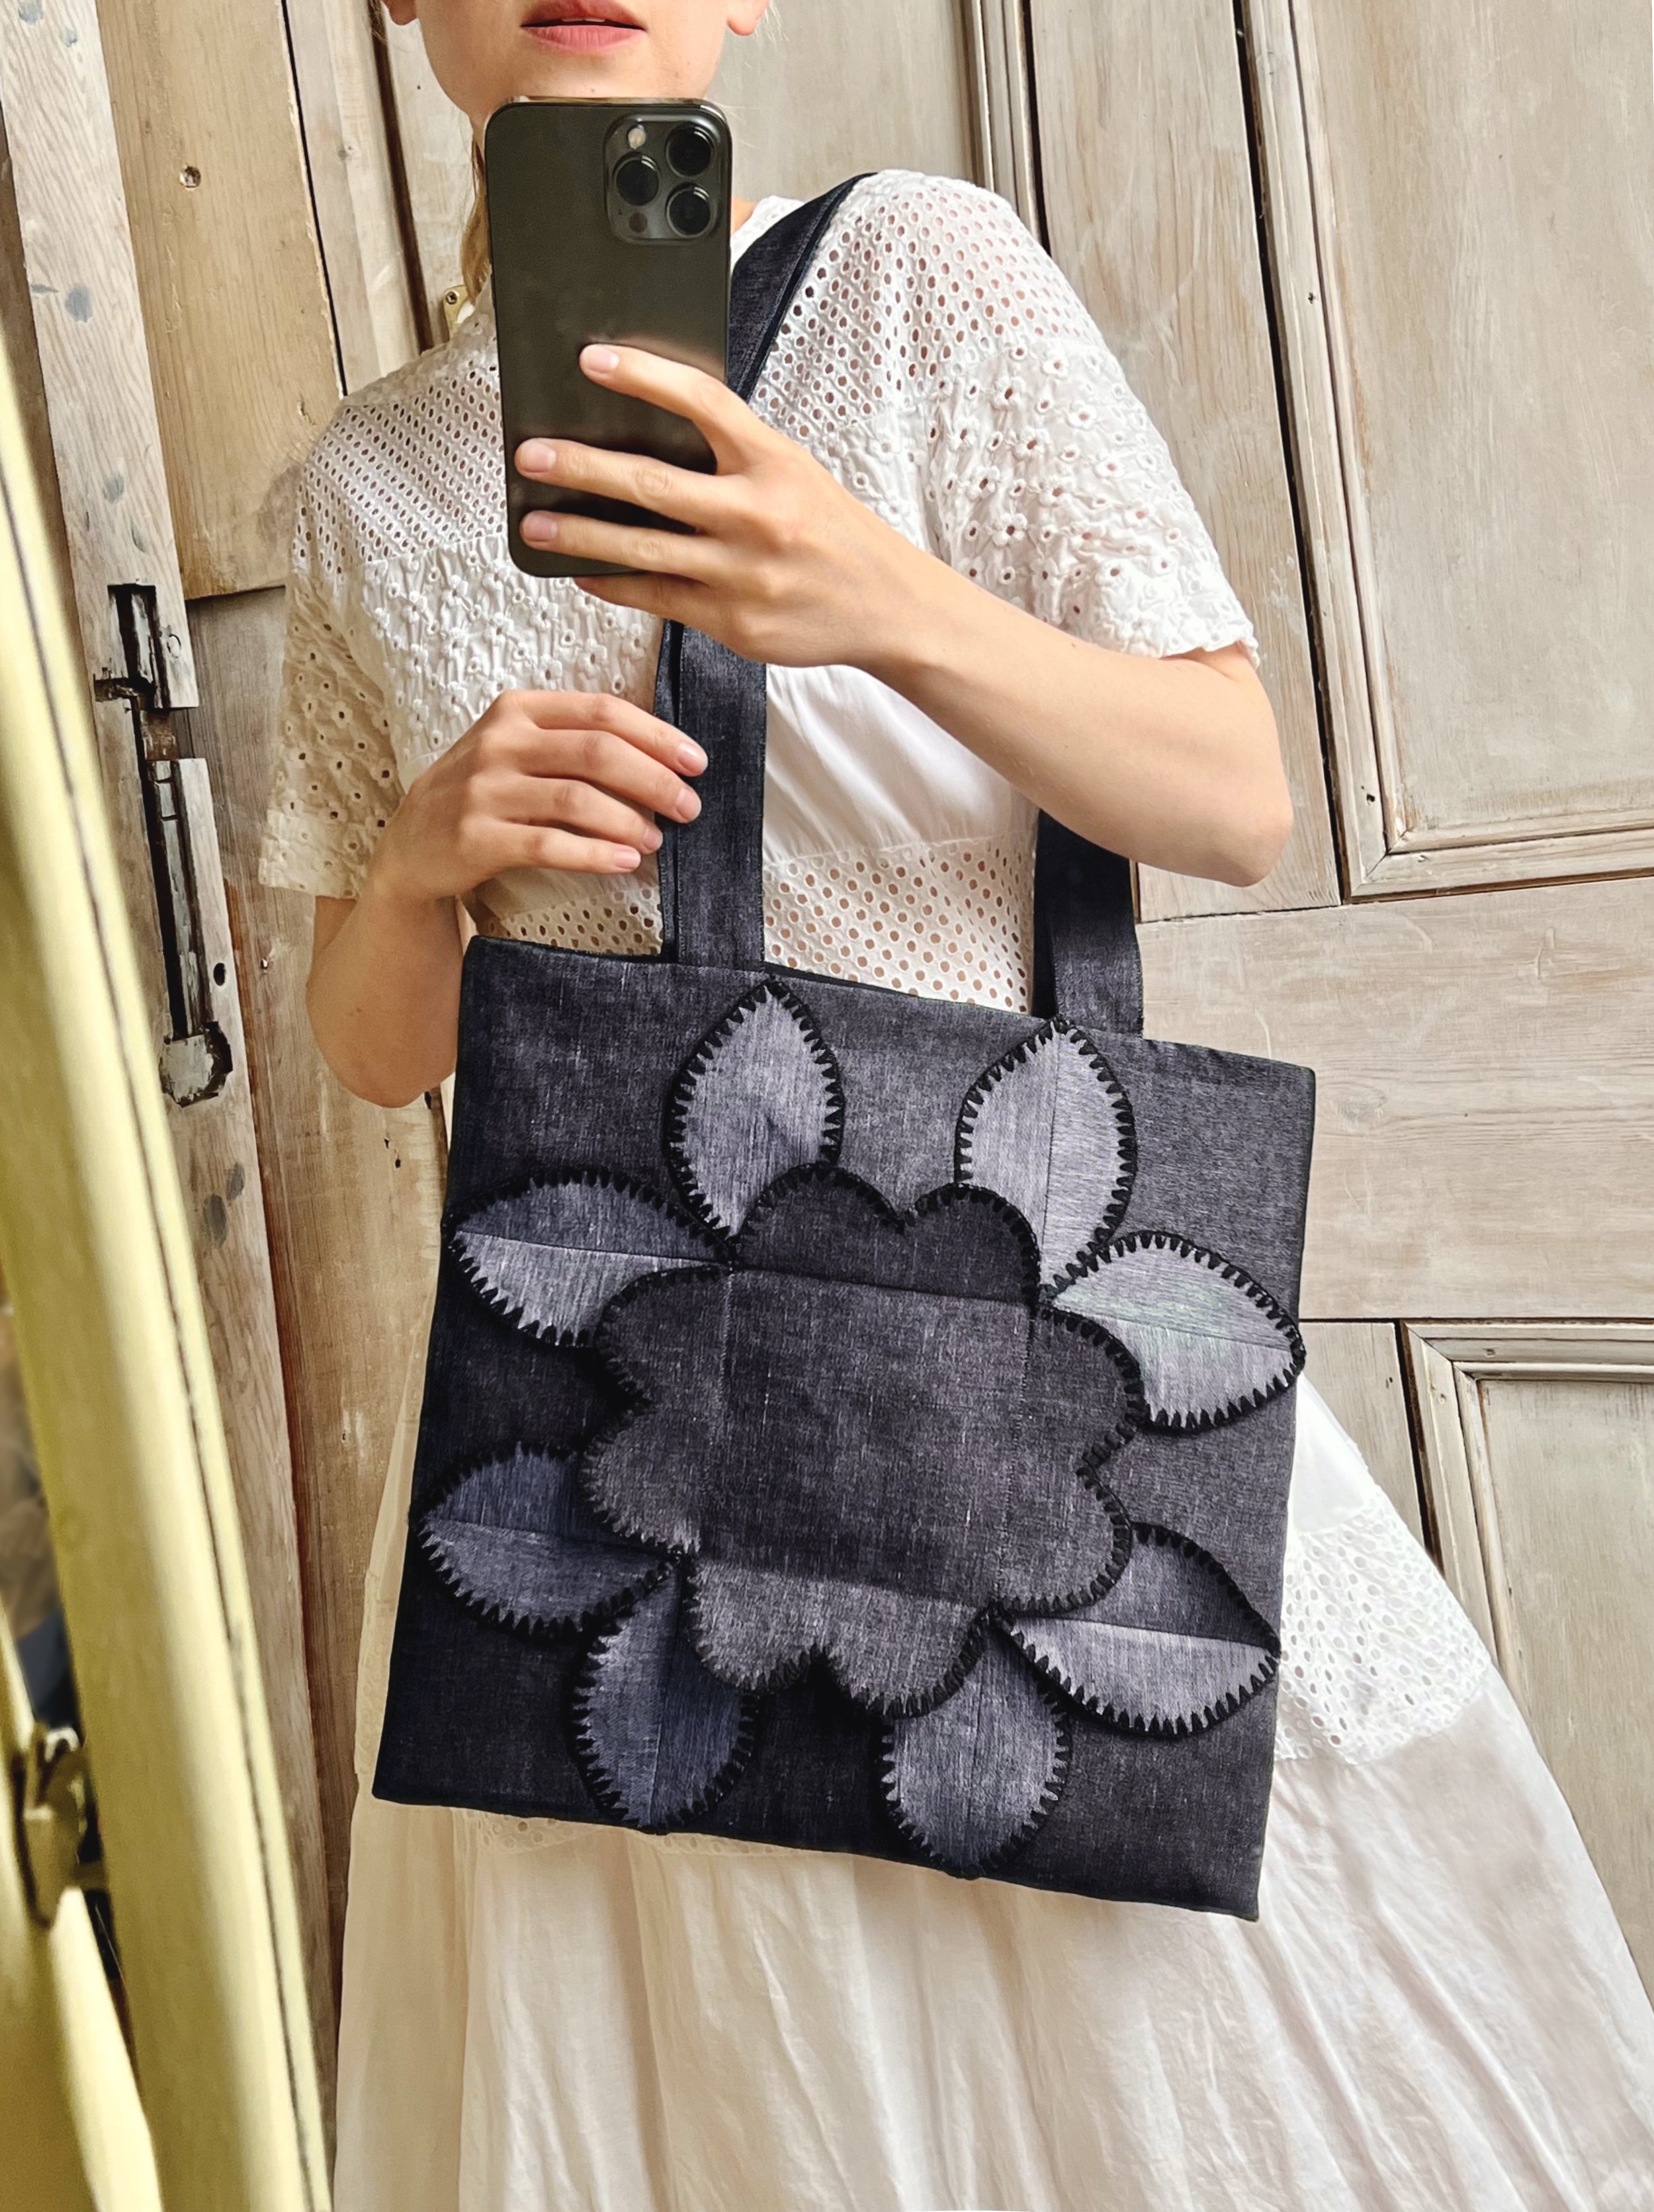
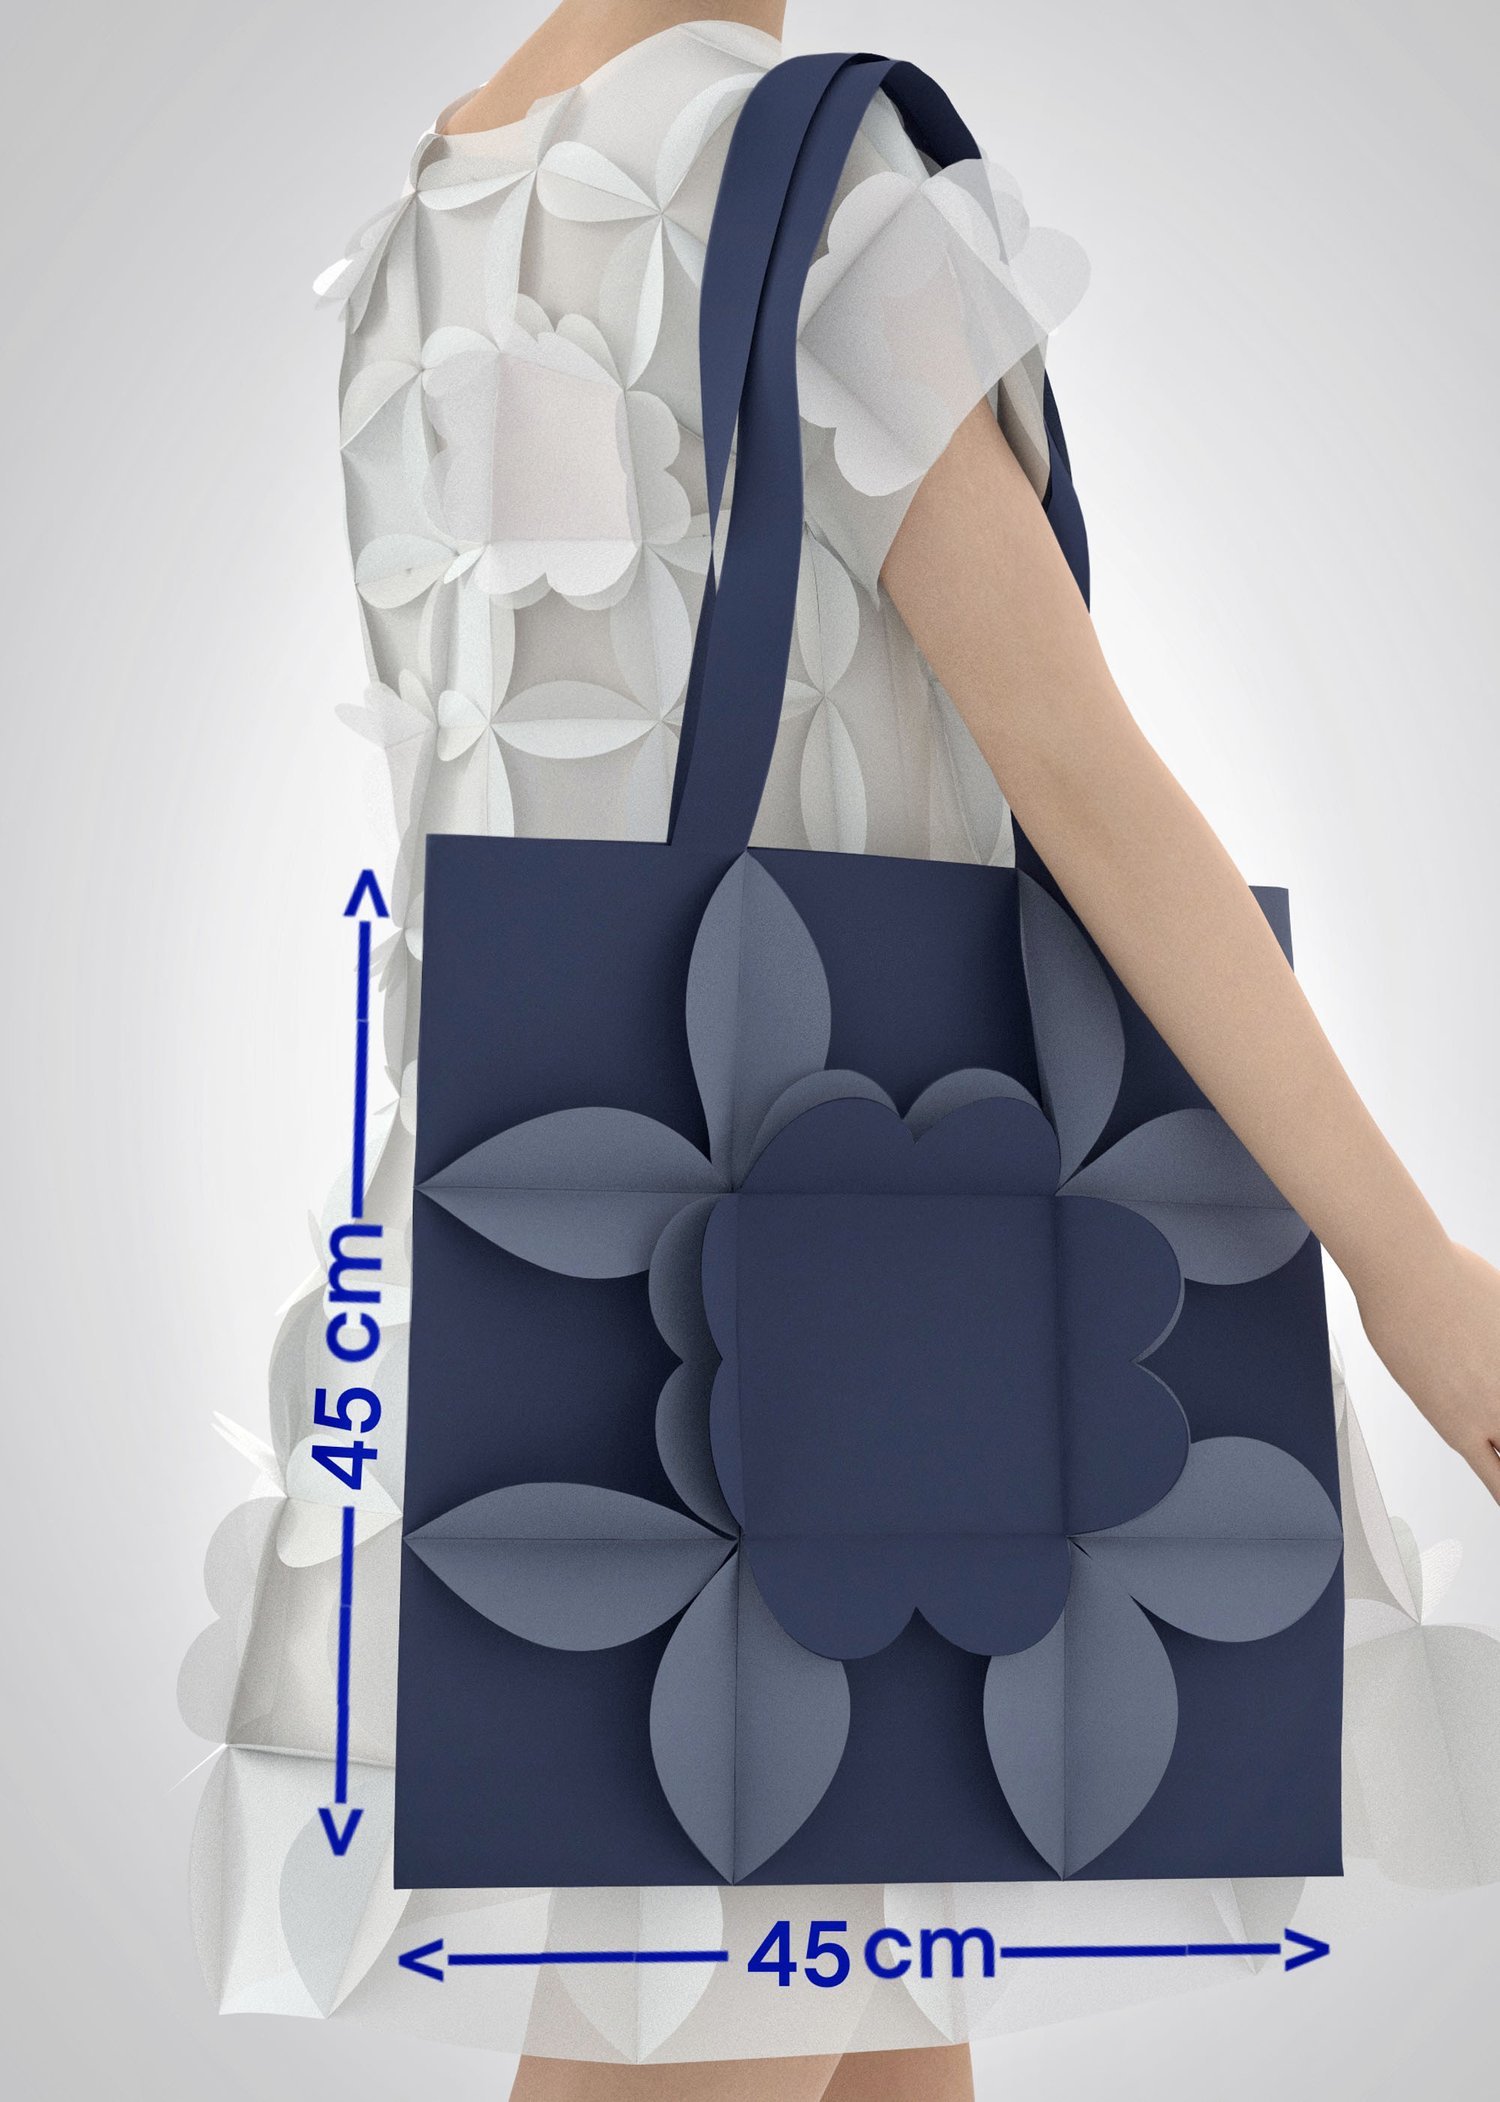
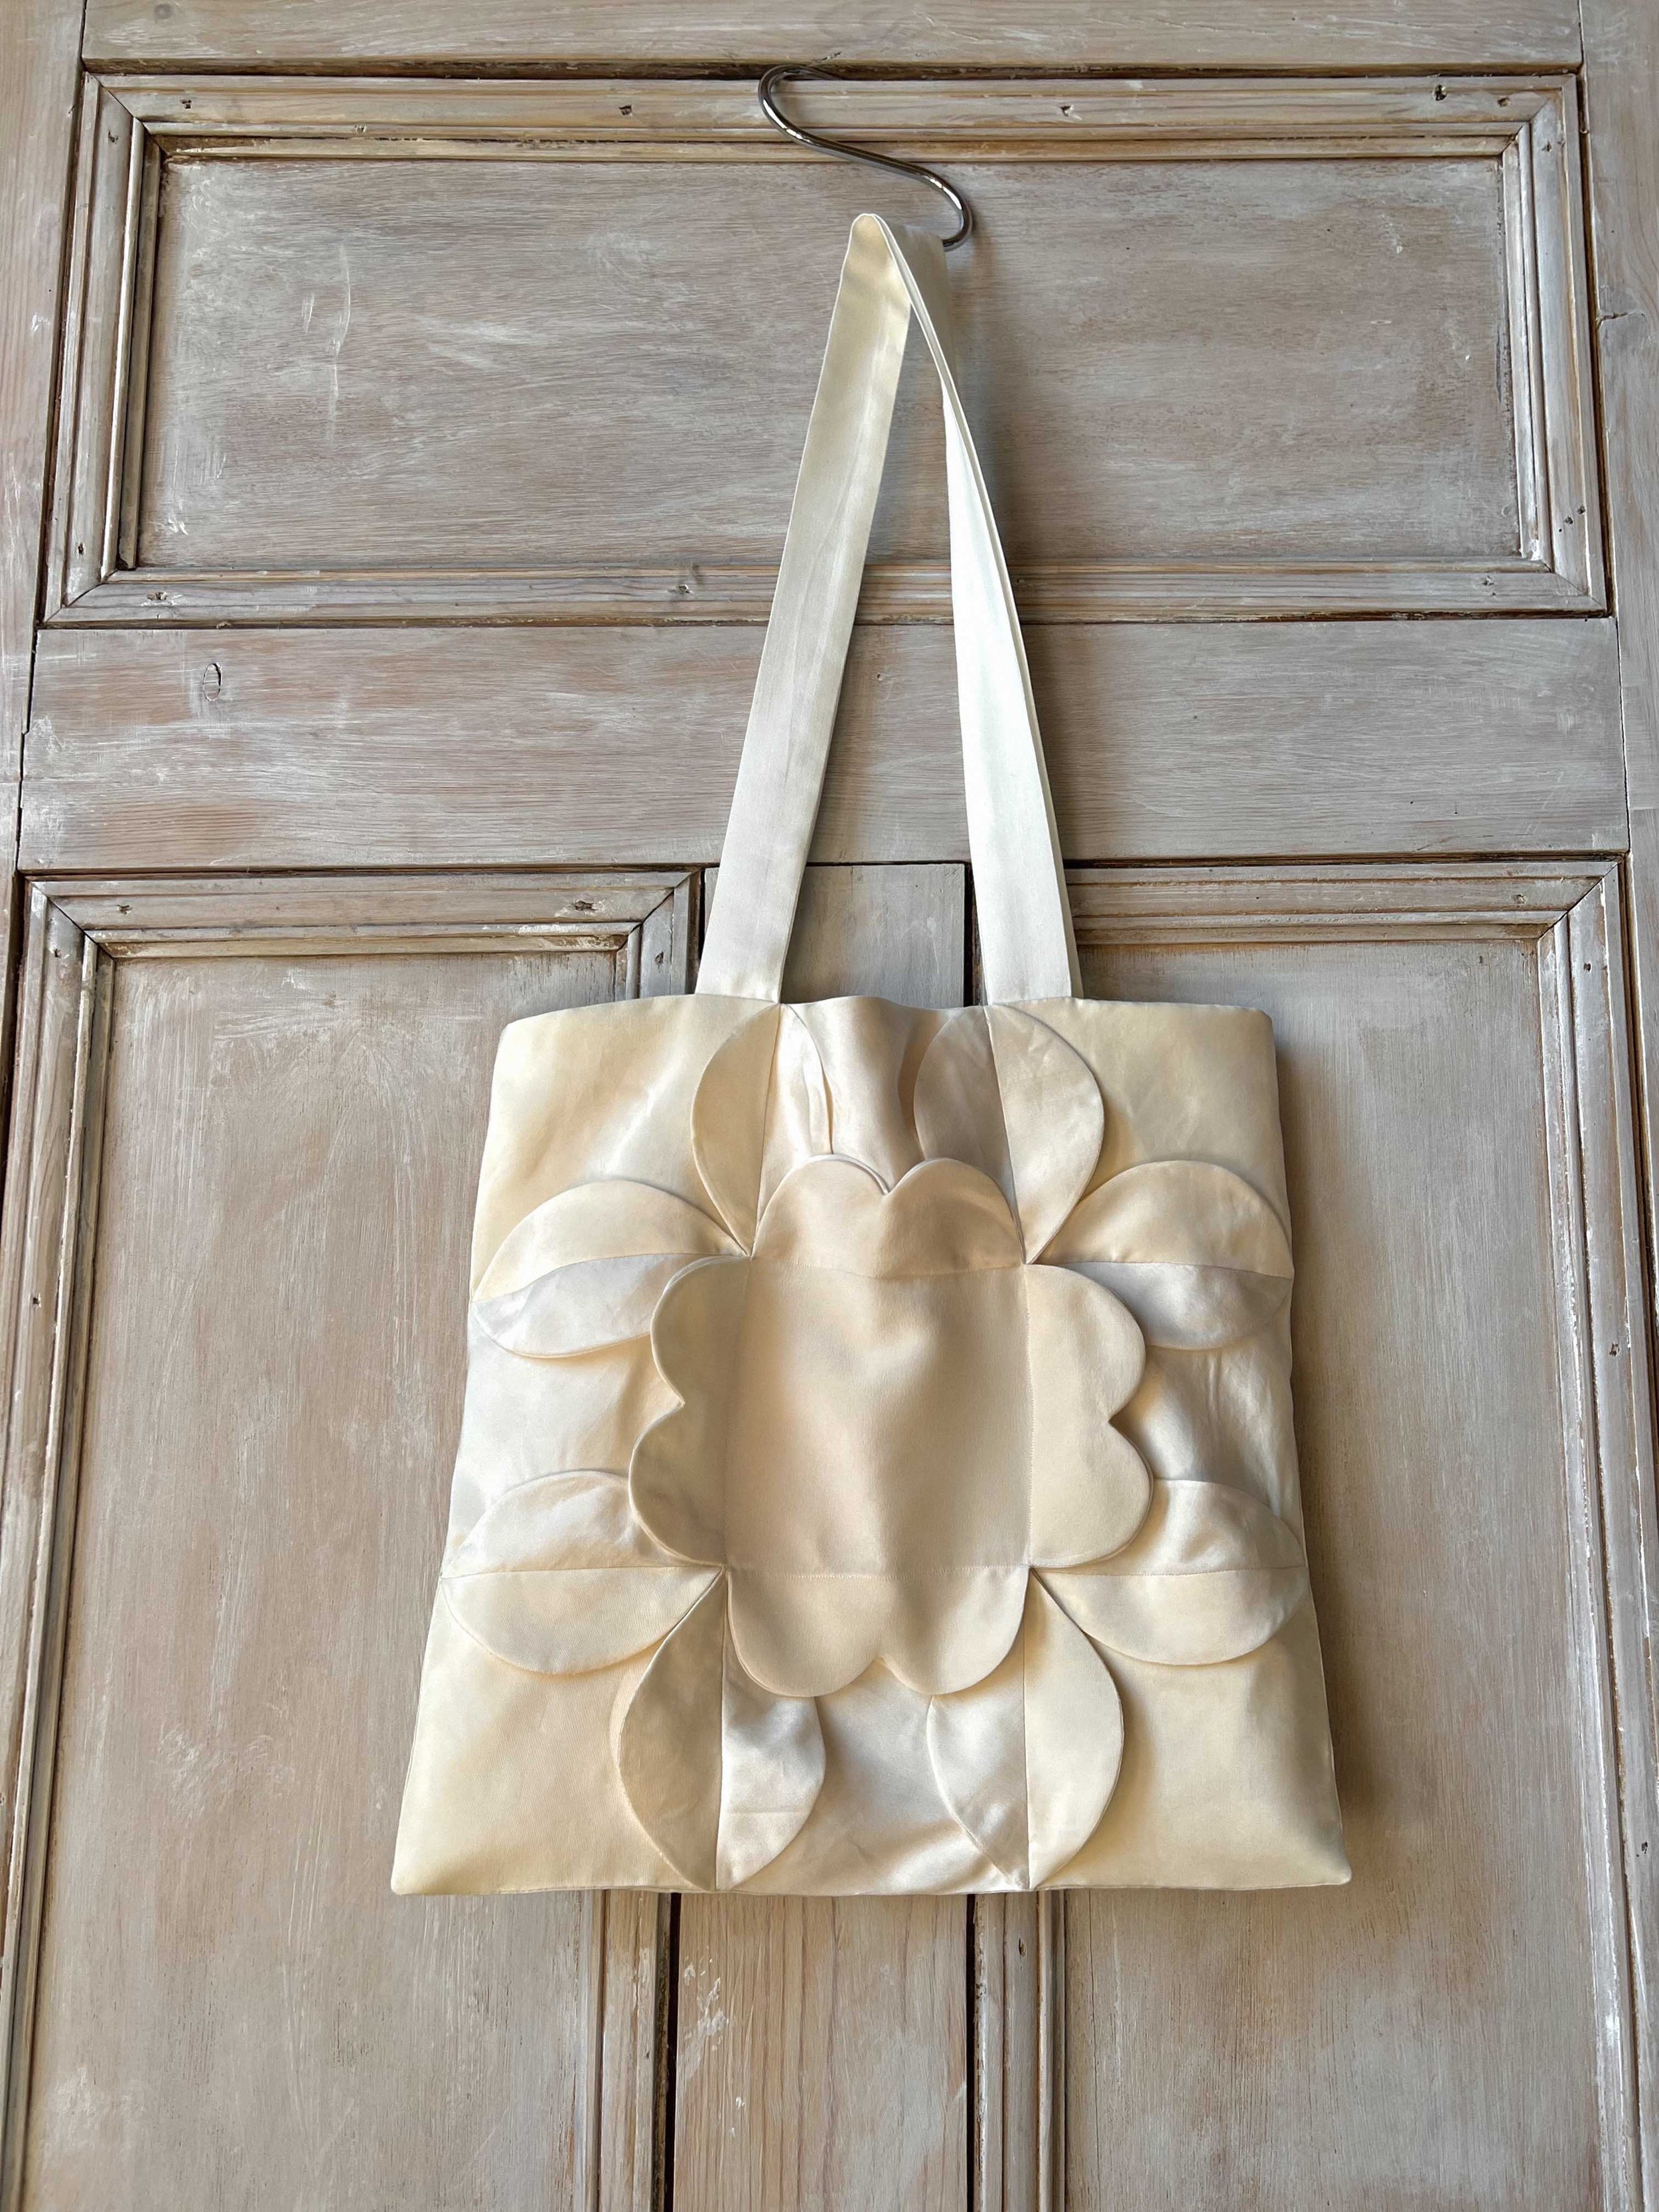
The simple shape of the bag is offset by the exaggerated floral 3d patchwork textile design, which features on both sides of the bag. It has 2 shoulder straps.
The Flower Patchwork Tote bag pattern is part of the Flower Patchwork Series, which is an exploration of the hybridisation of pattern cutting and textile design, which is at the core of what ROBERTS | WOOD does.
The Flower Patchwork Tote bag is designed as an entry-level project to make use of offcuts and remnants you may have leftover from other sewing projects, or possibly from unused textiles or clothing. It is one of the simpler pattern in the ROBERTS | WOOD KiT patchwork design series.. We would recommended this project for confident beginners.
For some fabric inspiration on this featured design, have a look at our blog post here.
Price - £ 12.00

This product is provided as a printable PDF pattern (with A4 and A0 printing options), and includes PDF sewing instructions for how to make the lined patchwork tote bag. The download includes 2 size options, Small and oversized. There is also the option to make either tote bag size with raw flower patchwork edges or fully bagged out flower patchwork pieces. All patterns for each option are provided
The Flower Patchwork Tote bag pattern is part of the Flower Patchwork Series, which is an exploration of the hybridisation of pattern cutting and textile design, which is at the core of what ROBERTS | WOOD does.
The Flower Patchwork Tote bag is designed as an entry-level project to make use of offcuts and remnants you may have leftover from other sewing projects, or possibly from unused textiles or clothing. It is the simplest pattern in the ROBERTS | WOOD KiT patchwork design series.
We would recommended this project for confident beginners
The simple shape of the bag is offset by the exaggerated floral 3d patchwork textile design, which features on both sides of the bag. It has 2 shoulder straps.
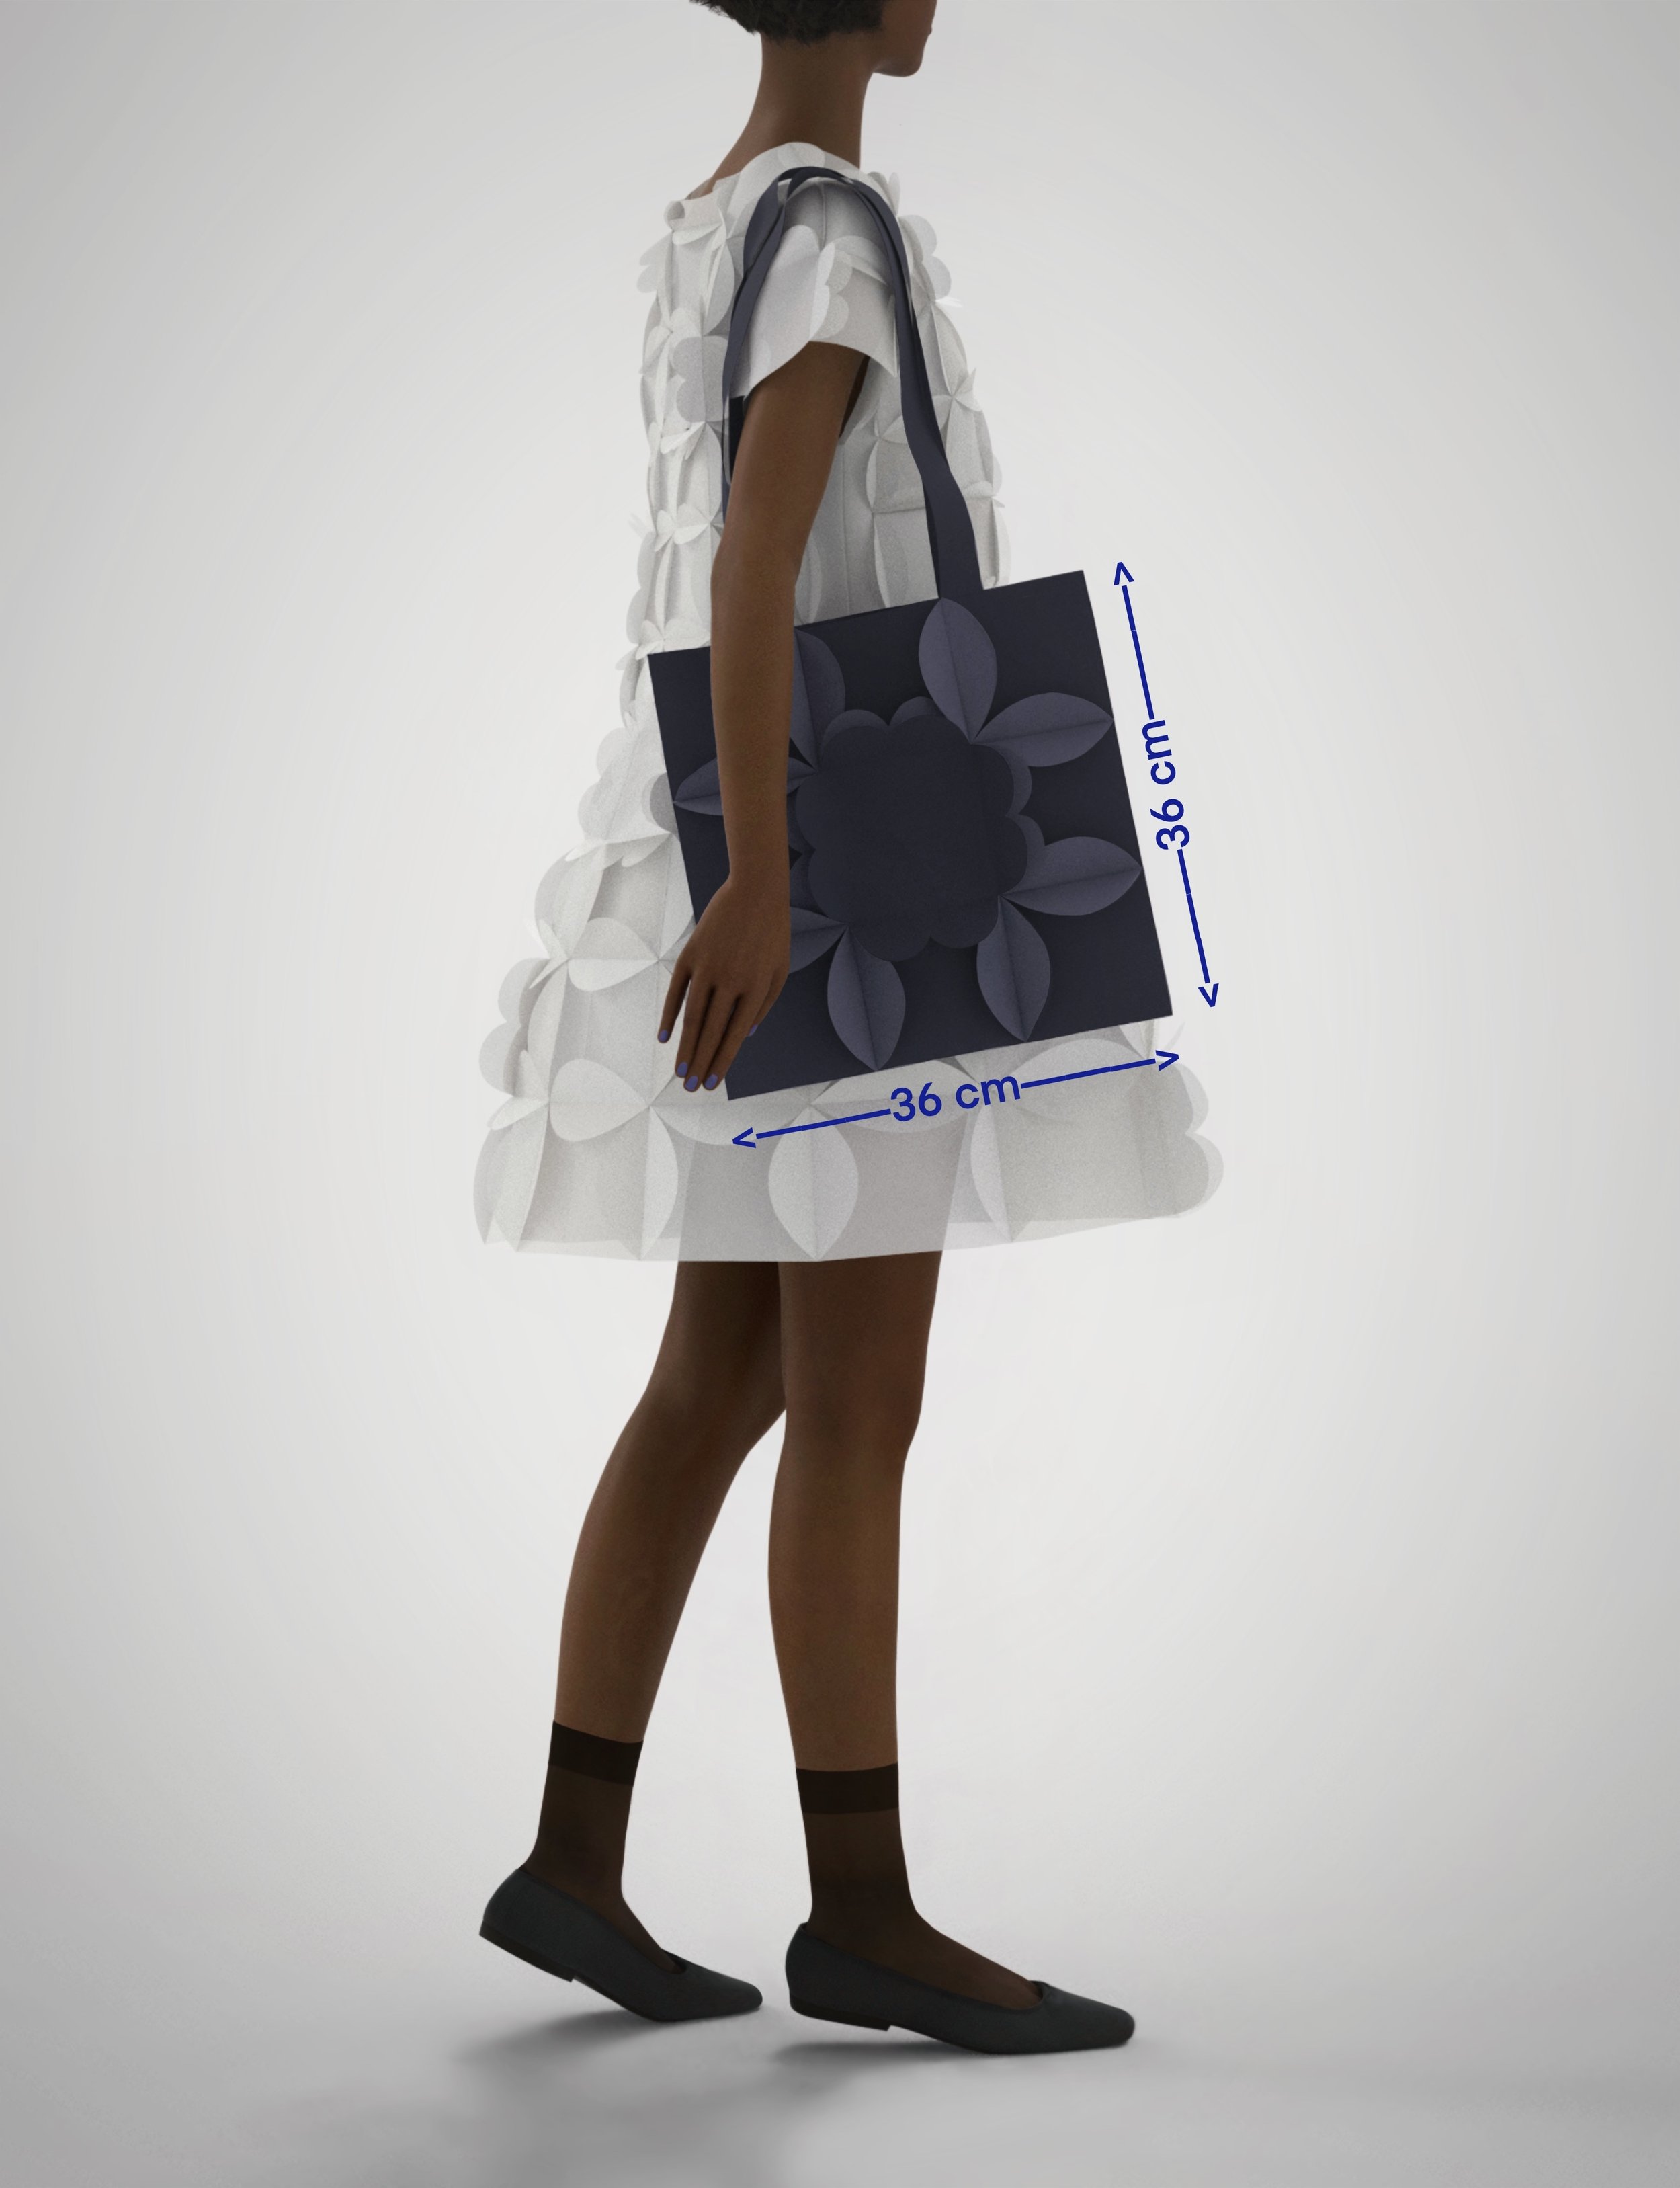
Finished bag measurements (Small / Oversized)
Height : 36 / 45cm
Width: 36 / 45cm
Strap length: 78cm
-
Finished bag measurements:
Small: 36cm x 36cm
Oversized: 45cm x 45cm
Strap length on both designs: 78cm
-
The general construction principle for this project is to construct the front flower ‘patches’ into columns, and then join the columns together. This process is repeated for the back, which is indentical to the front.
The front and back patchwork panels are sewn together to make a patchwork shell. The lining and straps are then constructed and the straps are trapped between the lining and patchwork shells. Finally the bag is “turned through’ via a hole left in the lining, which is then closed.
If you are making the ‘Alternative’ version (without raw edges), each of the flower Patches are ‘bagged-out’ prior to the Patches being joined together. Other than this, the construction sequence is the same.
This pattern has been specifically developed to make use of smaller remnants and offcuts of fabric which you might have left over from other sewing projects, or possibly from other unused textiles or clothing.
The possible combinations of colours and fabrics you can use in this project are infinite, making this an incredibly creative and exciting design. It also enables the maker to learn a new and unique ROBERTS | WOOD designed technique for building this 3D patchwork that we have developed in the design studio.
-
This pattern has been designed to make use of smaller remnants and offcuts of fabric that you might have left over from other sewing projects, or possibly from other unused textiles or unworn clothes you may have.
The design will work best with medium-weight fabrics.
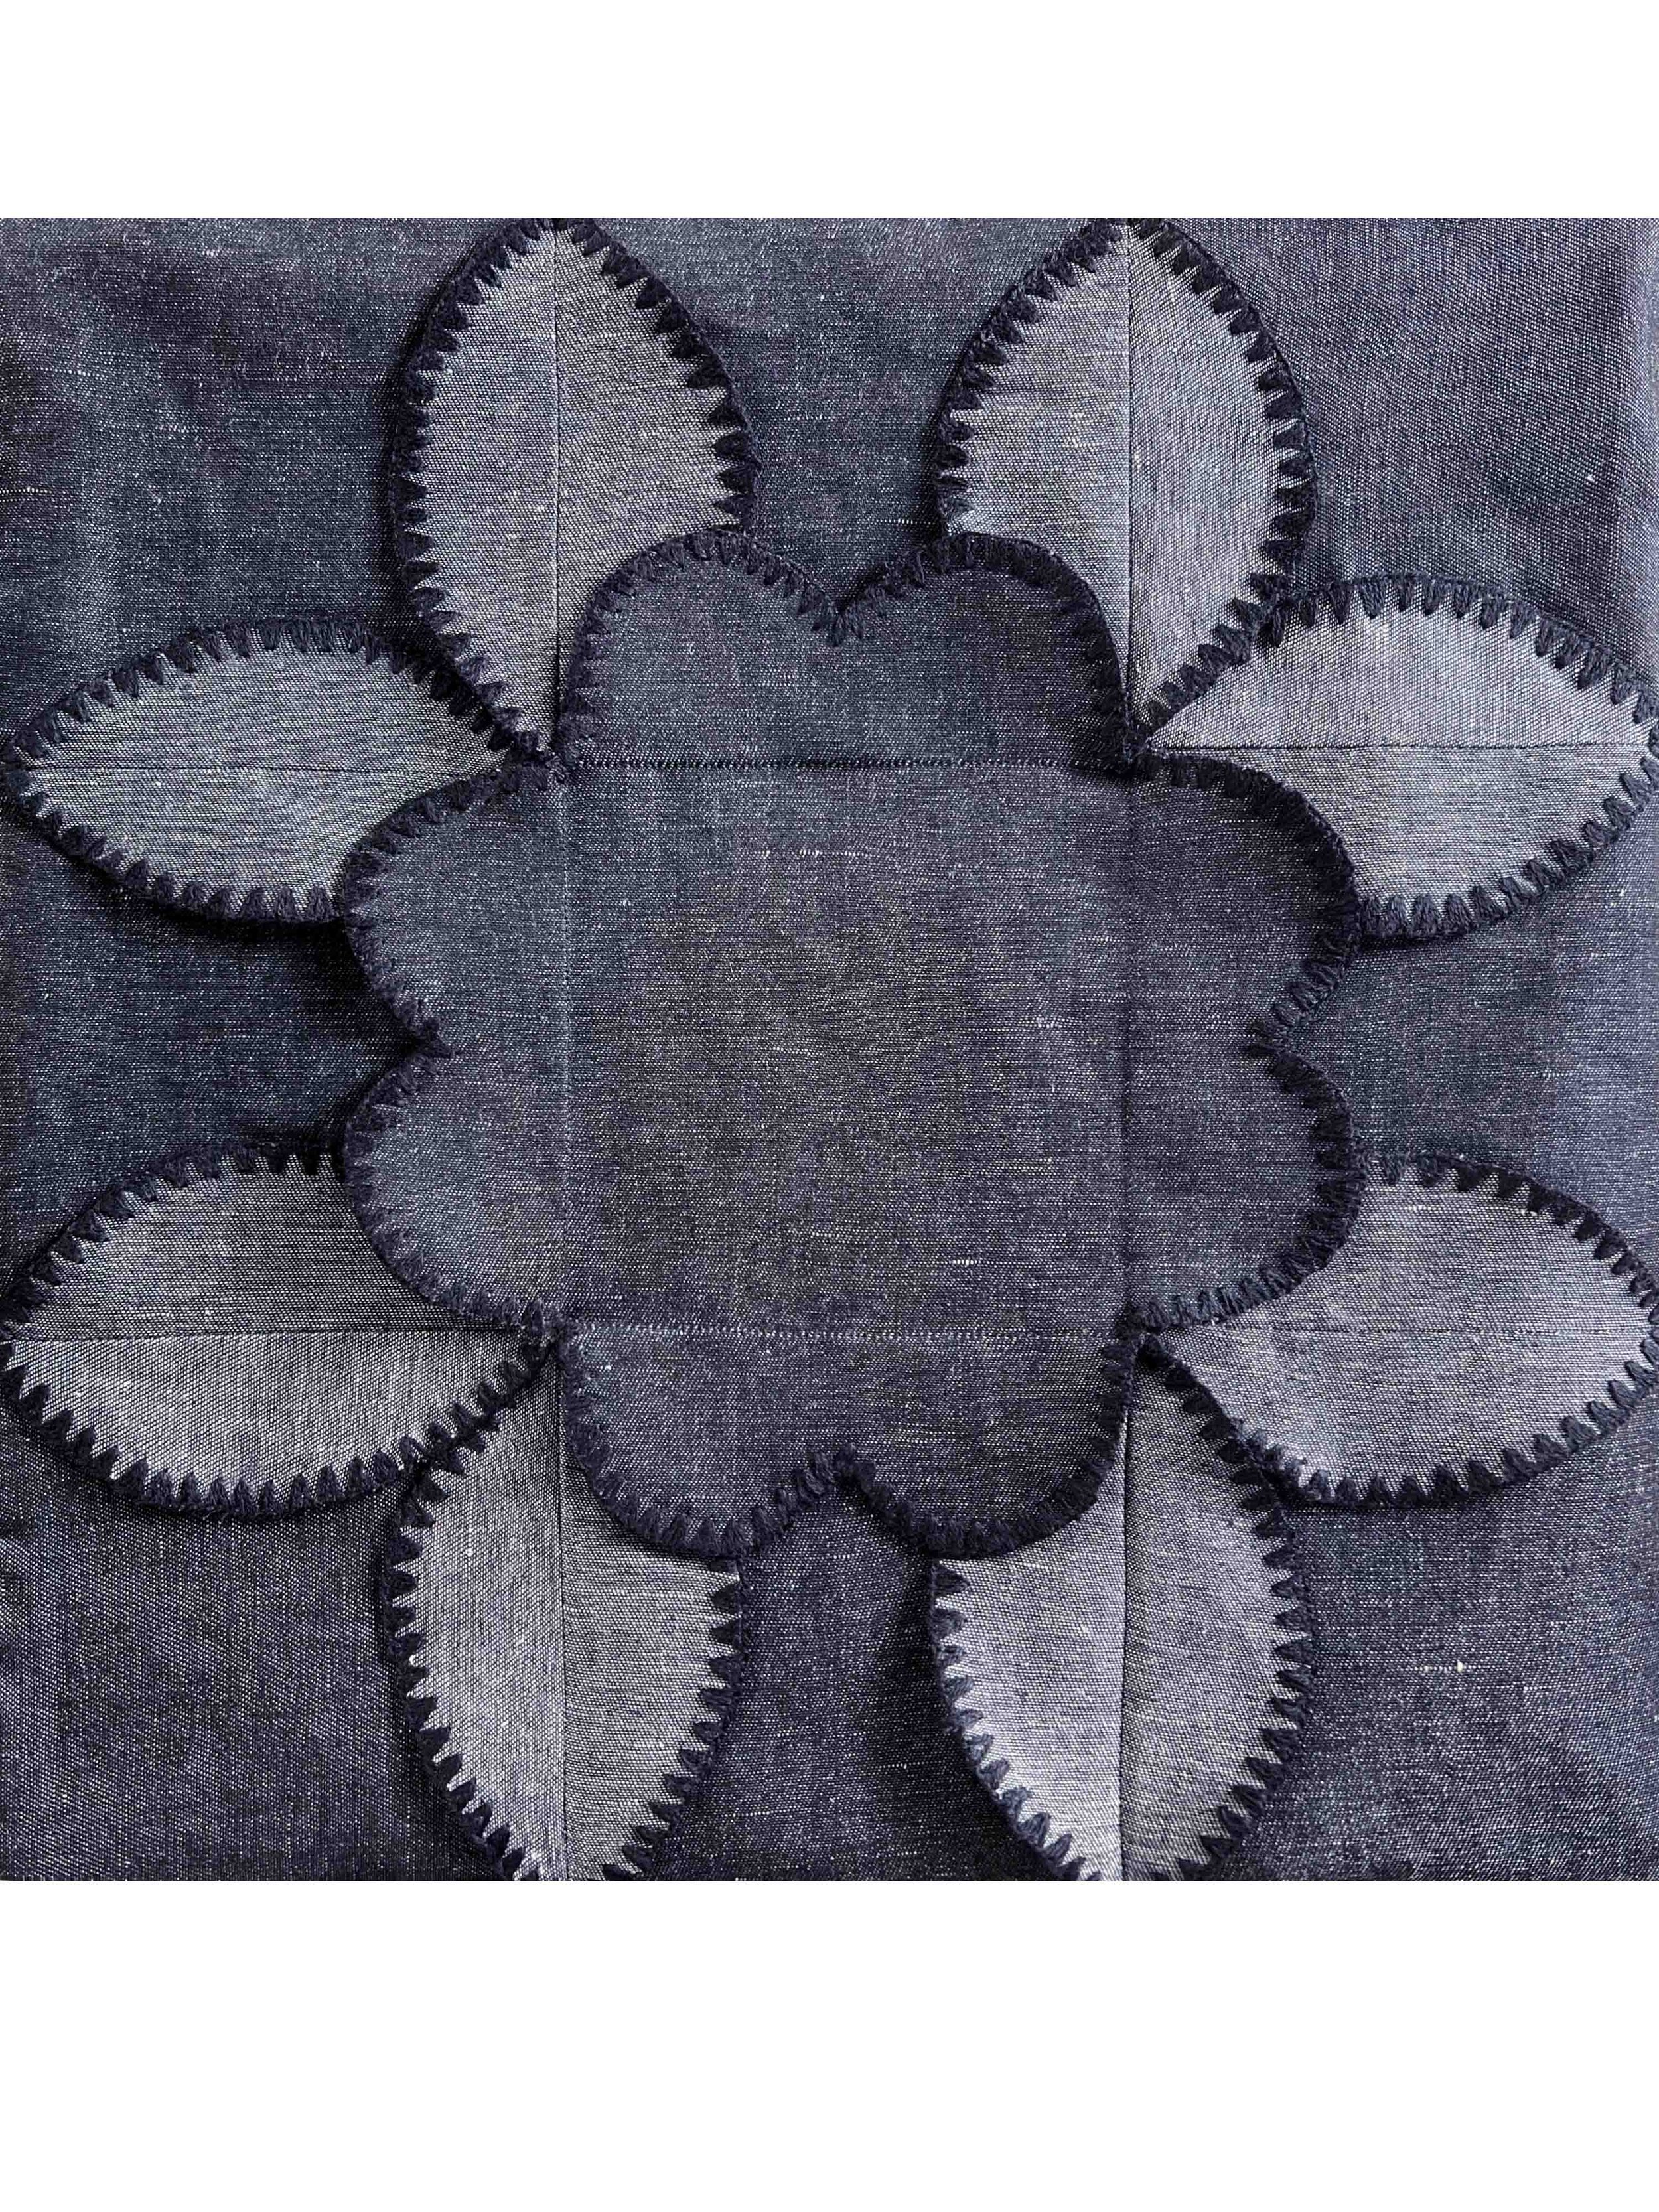
In our example of the ‘Original’ version (the blue Demin version pictured), we used a single fabric where the wrong side of the fabric has a different colour tone to the right side of the fabric. This creates a contrasting effect for the ‘Flower Petal’ elements in the design. If you want to create a similar effect to the example, you could use a denim fabric, or another fabric with similar contrasting right and wrong sides. If you want to make the ‘Alternative’ version with a contrasting effect, cut the flower patchwork patches used on the ‘Underside’ patches in a contrasting fabric to that used on the ‘Topside’ Patches. (see Appendix 1 for more details on the ‘Alternative’ non raw-edged design)
It is possible to customise this design in any way you choose, for example you could cut the pattern from multiple different fabrics depending on what you have available - e.g. each pattern piece could be cut from a completely different fabric if desired. You could also try a design where you use two different fabrics,
If you are making the “Original” design with raw edges, it is best to select a fabric with a fairly dense weave, as the exposed raw edges in the design means this will keep the frayed edges to a minimum (unless that is your desired effect). At the end of the instructions you will find suggestions for alternative finishes and extra top-stitching or hand-embroidery ideas that you may want to use depending on the desired effect and the types of fabric you have selected. These ideas can also be used to further adapt and customise the design.
-
This pattern is intended to be cut from remnants from your other projects however if you are sourcing fabric to use, you can refer to the below for the fabric usage :
Assumes 140cm wide fabric. Please note, if your fabric is narrower than 140cm wide, you will require longer lengths of each fabric.
-
This ROBERTS | WOOD KiT project is provided as a PDF pattern with full sewing instructions. It includes an A4 printable PDF pattern, which can be printed and assembled at home using any standard home printer and an A0 pattern which you can have printed at a print shop. All our projects include detailed instructions, showing you step by step how to make the project.
This project includes pattern pieces and instructions to make 2 different size versions of the bag - a small tote version , and an Oversized Version. There is also the option to make either tote bag size with raw flower patchwork edges or fully bagged out flower patchwork pieces. All patterns for each option are provided
-
Materials required:
Fabrics (see fabric usage for details of the amount required )
Equipment required: Paper scissors, sellotape (for assembling A4 pattern), Iron, fabric scissors, measuring tape, tailors chalk, safety pin, pins, sewing machine
-
Confident beginner to Intermediate sewist level and and beyond
This pattern is a great choice for anyone from confident beginner level and upwards. It assumes knowledge of basic sewing techniques and terminology, although most of the processes are very straightforward and easy to follow. It is a fun project for anyone who wants to learn new textile and sewing skills.
The project also provides detailed instructions, broken down for each step, so don’t worry if you don’t know where to start with assembling the design.
This is a perfect project to use up some fabric offcuts that might otherwise be going to waste.
This project is likely to take 1-2 days to complete (depending on the version you are making) - whilst the basis of the construction is quite simple, assembling the repeated 3D patchwork will take a little time and should be seen as a labour of love, designed for those who adore the making process.
-
We’ve added a “base” patten piece which will allow you to add a bottom to your tote bag.
This download includes the base pattern for both the small and oversized versions of the bag.